To create or edit a custom field, go to the Custom Fields page in the plugin admin. Here you will see a table with all your existing custom fields as well as a button to add a new one.
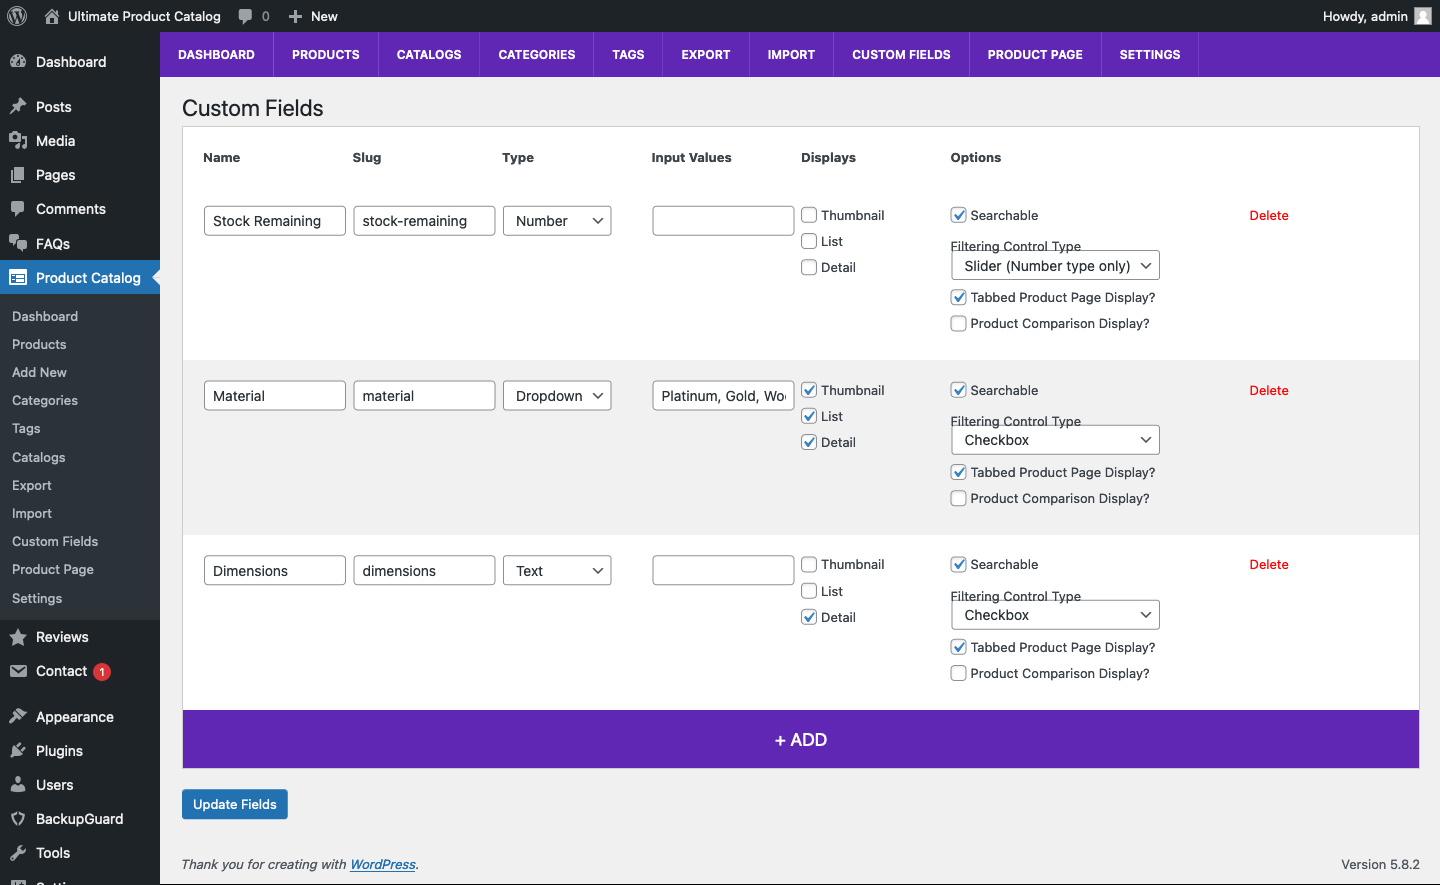
The process is the same to add or edit a field. You need to fill in the following for each:
- Name: The name you want to give to your custom field. This will display in the filtering sidebar, the product thumbnail and on the product page, if you enable any of those.
- Slug: Give the custom field a unique slug. This should contain only letters, numbers and hyphens. It will be used to identify the field behind the scenes, when the plugin queries it, as well as if you want to use the shortcode to display a value from this field elsewhere in the catalog.
- Type: Choose the type of custom field you want. This decides how you will input the value for this field on the product edit screen. So, for example, if you want to be able to insert anything, then choose text or or textarea. If would like there to be a set list of values, but will need to assign more than one value for each product, then you will want to use checkbox. If you would like to restrict it to only one value per product, then use radio or dropdown. There are also types for file upload and date/time.
- Input Values: If you are using the checkbox, radio or dropdown type, then you will need to provide input values here. These are the options from which you will be able to select on the product edit screen. Comma-separate your list, leaving no space after each comma. For example: Giraffe,Moose,Goose,Lion
- Displays: This sets in which view, if any, you would like the custom field information to display on the catalog page. If selected for any of the three views, it will display the custom field label and the value(s) for that product.
- Options
- Searchable: Checking this adds the custom field as a filter in the sidebar on the catalog page.
- Filtering Control Type: This sets the type of filter to be used in the sidebar on the catalog page. If would like people to be able to select more than one value at a time, then you will want to use checkbox. If you would like to restrict it to only one value at at time, then use radio or dropdown. To use the slider control type, you need to have set the custom field Type to Number.
- Tabbed Product Page Display?: Checking this add the custom field label and value to the Additional Information tab on the product page (when using either the Tabbed or Shop Style product page layouts).
- Product Comparison Display: Checking this adds the custom field as a row on the product comparison page.
When you’re done creating/editing your fields, make sure to click the Update Fields button to save your changes.
To learn about using custom fields with products, see here.